目前已有的框架
A review of bioinformatics pipeline framework 的作者对已有的工具进行很好的分类

作者的看法:
- implicit,也就是Make rule语法更适合用于整合不同执行工具
- 基于配置的流程更加稳定,也比较适合用于集群分配任务。
最后作者建议是:
- 如果实验室既不是纯粹的生物学试验(不需要workbench这种UI界面),也不需要高性能基于类的流程设计, 不太好选, 主要原则是投入和产出比
- 如果实验室进行的是重复性的研究,那么就需要对数据和软件进行版本控制, 建议是 configuration-based pipelines
- 如果实验室做的是探索性的概念证明类工作(exploratory proofs-of-concept),那么需要的是 DSL-based pipeline。
- 如果实验室用不到高性能计算机(HPC),只能用云服务器,就是server-based frameworks.
目前已有的流程可以在awesome-pipeline 进行查找。
就目前来看,pipeline frameworks & library 这部分的框架中 nextflow 是点赞数最多的生物学相关框架。只可惜nextflow在运行时需要创建fifo,而在NTFS文件系统上无法创建,所以我选择 snakemake , 一个基于Python写的DSL流程框架。
环境准备
为了能够顺利完成这部分的教程,请准备一个Linux环境,如果使用Windows,则按照biostarhandbook(一)分析环境和数据可重复 部署一个虚拟机,并安装miniconda3。
如下步骤会下载所需数据,并安装所需要的软件,并且启动工作环境。
1 | wget https://bitbucket.org/snakemake/snakemake-tutorial/get/v3.11.0.tar.bz2 |
当前环境下的所有文件
1 | ├── data |
基础:一个案例流程
如果你编译过软件,那你应该见过和用过make, 但是你估计也没有仔细想过make是干嘛用的。Make是最常用的软件构建工具,诞生于1977年,主要用于C语言的项目,是为了处理编译时存在各种依赖关系,尤其是部分文件更新后,Make能够重新生成需要更新的文件以及其对应的文件。
Snakemake和Make功能一致,只不过用Python实现,增加了许多Python的特性,并且和Python一样非常容易阅读。下面将使用Snakemake写一个变异检测流程。
第一步:序列比对
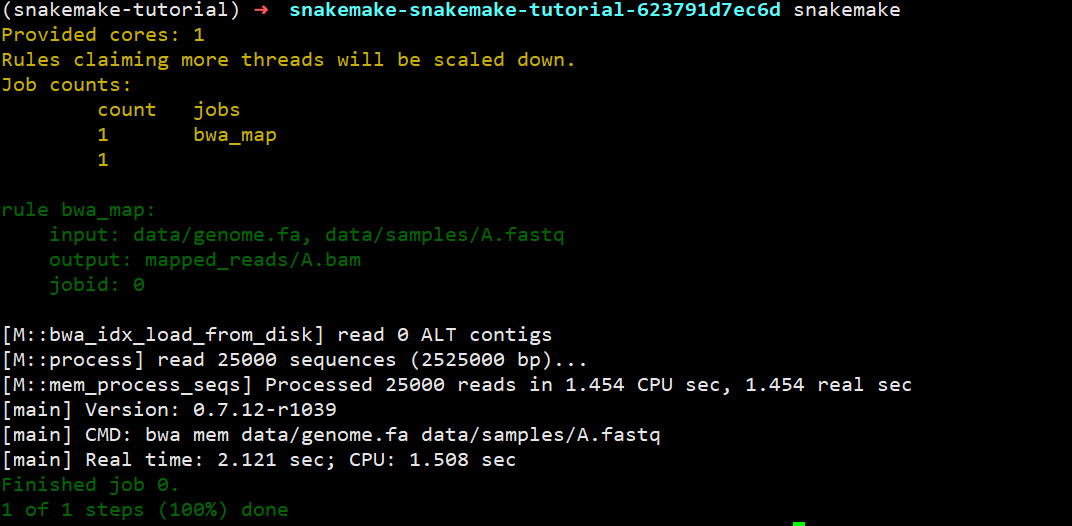
Snakemake非常简单,就是写各种rule来完成不同的任务。我们第一条rule就是将序列比对到参考基因组上。如果在命令行下就是bwa mem data/genome.fa data/samples/A.fastq | samtools view -Sb - > mapped_reads/A.bam。 但是按照Snakemake的规则就是下面的写法。
1 | # 用你擅长的文本编辑器 |
解释一下:这几行定义了一个规则(rule),在这个规则下,输入(input)有两个,而输出(output)只有一个,在shell中运行命令,只不过里面的文件都用{}形式替代。伪执行一下:snakemake -np mapped_reads/A.bam检查一下是否会出错,真实运行情况如下(不带规则,默认执行第一个规则):
第二步:推广序列比对规则
如果仅仅是上面这样子处理一个文件,还无法体现snakemake的用途,毕竟还不如手动敲代码来的方便。snakemake的一个有点在于它能够使用文件名通配的方式对一类文件进行处理。将上面的A改成{sample},就可以将符合*.fastq的文件处理成*.bam.
1 | rule bwa_map: |
那么,用snakemake -np mapped_reads/{A,B,C}.bam,就会发现,他非常机智的就比对了B.fastq和C.fastq,而不会再比对一遍A.fastq, 也不需要你写一堆的判断语句去手动处理。

当然,如果你用touch data/samples/A.fastq改变A.fastq的时间戳,他就会认位A.fastq文件发生了改变,那么重复之前的命令就会比对A.fastq。
第三步:比对后排序
比对后的文件还需要进一步的排序,才能用于后续分析,那么规则该如何写呢?
1 | rule samtools_sort: |
以之前的输出作为输出文件名,输出到另一个文件夹中。和之前的规则基本相同,只不过这里用到了wildcards.sample来获取通配名用作-T的临时文件的前缀sample实际名字。
运行snakemake -np sorted_reads/B.bam,你就会发现他就会非常智能的先比对再排序。这是因为snakemake会自动解决依赖关系,并且按照依赖的前后顺序进行执行。
第四步: 建立索引和对任务可视化
这里我们再写一个规则,对之前的排序后的BAM文件建立索引。
1 | rule samtools_index: |
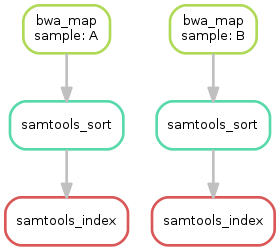
目前已经写了三个规则,那么这些规则的执行和依赖关系如何呢? snakemake提供了--dag选项用于dot命令进行可视化
1 | snakemake --dag sorted_reads/{A,B}.bam.bai | dot -Tsvg > dag.svg |
第五步:基因组变异识别
基因组变异识别需要整合之前所有的BAM文件,你可能会打算这样写
1 | rule bcftools_call: |
这样写的却没有问题,但是以后每多一个样本就需要多写一个输入,太麻烦了。这里就体现出Snakemake和Python所带来的特性了,我们可以用列表推导式的方法搞定。
1 | ["sorted_reads/{}.bam".format(sample) for sample in ["A","B"]] |
进一步,可以在规则外定义SAMPLES=["A","B"],则规则内的输入可以写成bam=["sorted_reads/{}.bam".format(sample) for sample in SAMPLES]. 由于列表推导式比较常用,但是写起来有点麻烦,snakemake定义了expand进行简化, 上面可以继续改写成expand("sorted_reads/{sample}.bam", sample=SAMPLES)
那么最后的规则就是
1 | SAMPLES=["A","B"] |
小练习: 请用snakemake生成当前的DAG图。
第六步:编写报告
上面都是在规则里执行shell脚本,snakemake的一个优点就是可以在规则里面写Python脚本,只需要把shell改成run,此外还不需要用到引号。
1 | rule report: |
这里还用到了snakemake的一个函数,report,可以对markdown语法进行渲染生成网页。
第七步:增加目标规则
之前运行snakemake都是用的snakemake 目标文件名, 除了目标文件名外,snakemake还支持规则名作为目标。通常我们按照习惯定义一个all规则,来生成结果文件。
1 | rule all: |
基础部分小结:
总结下学习过程,知识点如下:
- Snakemake基于规则执行命令,规则一般由
input, output,shell三部分组成。 - Snakemake可以自动确定不同规则的输入输出的依赖关系,根据时间戳来判断文件是否需要重新生成
- Snakemake
以{sample}.fa形式进行文件名通配,用{wildcards.sample}获取sample的实际文件名 - Snakemake用
expand()生成多个文件名,本质是Python的列表推导式 - Snakemake可以在规则外直接写Python代码,在规则内的
run里也可以写Python代码。 - Snakefile的第一个规则通常是
rule all,因为默snakemake默认执行第一条规则
进阶:对流程进一步修饰
在基础部分中,我们完成了流程的框架,下一步则是对这个框架进行不断完善,比如说编写配置文件,声明不同rule的消耗资源,记录运行日志等。
第一步: 声明所需进程数
对于一些工具,比如说bwa,多进程或者多线程运行能够大大加速计算。snakemake使用threads来定义当前规则所用的进程数,我们可以对之前的bwa_map增加该指令。
1 | rule bwa_map: |
声明threads后,Snakemake任务调度器就会在程序运行的时候是否并行多个任务。这主要和参数中的--cores相关。比如说
1 | snakemake --cores 10 |
由于总体上就分配了10个核心,于是一次就只能运行一个需要消耗8个核心的bwa_map。但是当其中一个bwa_map运行完毕,这个时候snakemaek就会同时运行一个消耗8个核心的bwa_map和没有设置核心数的samtools_sort,来保证效率最大化。因此对于需要多线程或多进程运行的程序而言,将所需的进程单独编码,而不是硬编码到shell命令中,能够更有效的使用资源。
第二步:配置文件
之前的SAMPLES写在了snakefile,也就是意味这对于不同的项目,需要对snakefile进行修改,更好的方式是用一个配置文件。配置文件可以用JSON或YAML语法进行写,然后用configfile: "config.yaml"读取成字典,变量名为config。
config.yaml内容为:
1 | samples: |
YAML使用缩进表示层级关系,其中缩进必须用空格,但是空格数目不重要,重要的是所今后左侧对齐。上面的YAML被Pytho读取之后,以字典保存,形式为
{'samples': {'A': 'data/samples/A.fastq', 'B': 'data/samples/B.fastq'}}
而snakefile也可以改写成
1 | configfile: "config.yaml" |
虽然sample是一个字典,但是展开的时候,只会使用他们的key值部分。
关于YAML格式的教程,见阮一峰的博客:http://www.ruanyifeng.com/blog/2016/07/yaml.html
第三步:输入函数
既然已经把文件路径都存入到配置文件中,那么可以进一步的改写之前的bwa_map里的输入部分。也就是从字典里面提取到存放的路径。最开始我就是打算这样写
1 | rule bwa_map: |
毕竟”{sample}”从理论上应该得到sample的名字。但是snakemake -np显示出现错误
1 | KeyError in line 11 of /home6/zgxu/snakemake-snakemake-tutorial-623791d7ec6d/Snakefile: |
这可能是{sample}的形式只能在匹配的时候使用,而在获取值的时候应该用基础第三步的wildcards.sample形式。于是继续改成config["samples"][wildcards.sample]。然而还是出现了错误。
1 | name 'wildcards' is not defined |
为了理解错误的原因,并找到解决方法,我们需要理解Snakemake工作流程执行的一些原理,它执行分为三个阶段
- 在初始化阶段,工作流程会被解析,所有规则都会被实例化
- 在DAG阶段,也就是生成有向无环图,确定依赖关系的时候,所有的通配名部分都会被真正的文件名代替。
- 在调度阶段,DAG的任务按照顺序执行
也就是说在初始化阶段,我们是无法获知通配符所指代的具体文件名,必须要等到第二阶段,才会有wildcards变量出现。也就是说之前的出错的原因都是因为第一个阶段没通过。这个时候就需要输入函数推迟文件名的确定,可以用Python的匿名函数,也可以是普通的函数
1 | rule bwa_map: |
第四步:规则参数
有些时候,shell命令不仅仅是由input和output中的文件组成,还需要一些静态的参数设置。如果把这些参数放在input里,则会因为找不到文件而出错,所以需要专门的params用来设置这些参数。
1 | rule bwa_map: |
写在rule中的params的参数,可以在shell命令中或者是run里面的代码进行调用。
第五步: 日志文件
当工作流程特别的大,每一步的输出日志都建议保存下来,而不是输出到屏幕,这样子出错的时候才能找到出错的所在。snakemake非常贴心的定义了log,用于记录日志。好处就在于出错的时候,在log里面定义的文件是不会被snakemake删掉,而output里面的文件则是会被删除。继续修改之前的bwa_map.
1 | rule bwa_map: |
这里将标准错误重定向到了log中。
第六步:临时文件和受保护的文件
由于高通量测序的数据量通常很大,因此很多无用的中间文件会占据大量的磁盘空间。而特异在执行结束后写一个shell命令清除不但写起来麻烦,而且也不好管理。Snakemake使用temp()来将一些文件标记成临时文件,在执行结束后自动删除。
1 | rule bwa_map: |
修改之后的代码,当samtools_sort运行结束后就会把”mapped_reads”下的BAM删掉。同时由于比对和排序都比较耗时,得到的结果要是不小心被误删就会浪费大量计算时间,最后的方法就是用protected()保护起来
1 | rule samtools_sort: |
最后,snakemake就会在文件系统中对该输出文件写保护,也就是最后的权限为-r--r--r--, 在删除的时候会问你rm: remove write-protected regular file ‘A.bam’?.
进阶部分小结
- 使用
threads:定义不同规则所需线程数,有利于snakemake全局分配任务,最优化任务并行 - 使用
configfile:读取配置文件,将配置和流程分离 - snakemake在DAG阶段才会知道通配的具体文件名,因此在input和output出现的
wildcards就需要推迟到第二步。 - 在
log里定义的日志文件,不会因任务失败而被删除 - 在
params定义的参数,可以在shell和run中直接调用 temp()中的文件运行结束后会被删除,而protected()中的文件会有写保护,避免意外删除。
高级:实现流程的自动部署
上面的分析流程都是基于当前环境下已经安装好要调用的软件,如果你希望在新的环境中也能快速部署你的分析流程,那么你需要用到snakmake更高级的特性,也就是为每个rule定义专门的运行环境。
全局环境
我建议你在新建一个snakemake项目时,都先用conda create -n 项目名 python=版本号创建一个全局环境,用于安装一些常用的软件,例如bwa、samtools、seqkit等。然后用如下命令将环境导出成yaml文件
1 | conda env export -n 项目名 -f environment.yaml |
那么当你到了一个新的环境,你就可以用下面这个命令重建出你的运行环境
1 | conda env create -f environment.yaml |
局部环境
当然仅仅依赖于全局环境或许还不够,对于不同的规则(rule)可能还有Python2和Python3的区别,所以你还得为每个规则创建环境。
snakemake有一个参数--use-conda,会解析rule中的conda规则,根据其提供的yaml文件安装特定版本的工具,以基础第一步的序列比对为例,
1 | rule bwa_map: |
随后在snakemake执行的目录下创建envs文件夹,增加map.yaml, 内容如下
1 | name: map |
注意: YAML文件的name行不是必要的,但是建议加上。
那么当你用snakmake --use-conda执行时,他就会在.snakemake/conda下创建专门的conda环境用于处理当前规则。对于当前项目,该conda环境创建之后就会一直用于该规则,除非yaml文件发生改变。
如果你希望在实际运行项目之前先创建好环境,那么可以使用--create-envs-only参数。
由于默认情况下,每个项目运行时只会在当前的.snakemake/conda查找环境或者安装环境,所以在其他目录执行项目时,snakemake又会重新创建conda环境,如果你担心太占地方或者环境太大,安装的时候太废时间,你可以用--conda-prefix指定专门的文件夹。
一定要使用最新的snakemake和最新的conda。因为conda在启动环境的命令发生过变化,从source activate改成了conda activate
代码总结
最后的代码如下
1 | configfile: "config.yaml" |
执行snakemake
写完Snakefile之后就需要用snakemake执行。snakemake的选项非常多,这里列出一些比较常用的运行方式。
运行前检查潜在错误:
1 | snakemake -n |
直接运行:
1 | snakemake |
强制重新运行:
1 | snakemake -f |
可视化:
1 | snakemake --dag | dot -Tsvg > dag.svg |
集群执行:
1 | snakemake --cluster "qsub -V -cwd -q 投递队列" -j 10 |