通常circos的中间部分不是空白区域,会用一条条线进行连接,表示两个染色体部分区域有关系。
数据格式
对于link,circos要求输入数据至少有6列,分别是chr1 start1 end1 chr2 start2 end2 [options]
举个例子
1
| chr1 1000000 2000000 chr5 3000000 4000000
|
构建输入
这次会以A. lyrata 和 A.thalina的基因组为例,利用JCVI来构建Circos的输入.
新建一个项目文件夹
1
| mkdir -p ath_aly && cd ath_aly
|
如果没有安装jcvi,用conda进行安装
1
2
3
4
5
6
| conda create -n jcvi jcvi
conda activate jcvi
conda install last scipy
wget https://raw.githubusercontent.com/tanghaibao/jcvi-bin/master/bin/scip
chmod 755 scip
mv scip ~/miniconda3/bin
|
数据下载
从http://plants.ensembl.org/index.html分别下载这两个物种的GFF文件和CDS序列,
1
2
3
4
5
6
|
wget ftp://ftp.ensemblgenomes.org/pub/plants/release-44/fasta/arabidopsis_thaliana/cds/Arabidopsis_thaliana.TAIR10.cds.all.fa.gz
wget ftp://ftp.ensemblgenomes.org/pub/plants/release-44/gff3/arabidopsis_thaliana/Arabidopsis_thaliana.TAIR10.44.gff3.gz
wget ftp://ftp.ensemblgenomes.org/pub/plants/release-44/fasta/arabidopsis_lyrata/cds/Arabidopsis_lyrata.v.1.0.cds.all.fa.gz
wget ftp://ftp.ensemblgenomes.org/pub/plants/release-44/gff3/arabidopsis_lyrata/Arabidopsis_lyrata.v.1.0.44.gff3.gz
|
数据预处理
将GFF3转成BED格式
1
2
| python -m jcvi.formats.gff bed --type=mRNA --key=transcript_id Arabidopsis_thaliana.TAIR10.44.gff3.gz > ath.bed
python -m jcvi.formats.gff bed --type=mRNA --key=transcript_id Arabidopsis_lyrata.v.1.0.44.gff3.gz > aly.bed
|
将BED去重复
1
2
| python -m jcvi.formats.bed uniq ath.bed
python -m jcvi.formats.bed uniq aly.bed
|
提取CDS序列
1
2
| seqkit grep -f <(cut -f 4 ath.bed ) Athaliana_167_TAIR10.cds.fa.gz | seqkit seq -i > ath.cds
seqkit grep -f <(cut -f 4 aly.bed ) Arabidopsis_lyrata.v.1.0.cds.all.fa.gz | seqkit seq -i > aly.cds
|
karyotype
从ENSEMBLE下载的GFF文件中,已经包含了每个基因组的大小, 当然也可以各种工具从基因组序列序列中获取大小。
karyotype.aly.txt
1
2
3
4
5
6
7
8
| chr - aly1 aly1 0 33132539 rdylbu-11-div-1
chr - aly2 aly2 0 19320864 rdylbu-11-div-2
chr - aly3 aly3 0 24464547 rdylbu-11-div-3
chr - aly4 aly4 0 23328337 rdylbu-11-div-4
chr - aly5 aly5 0 21221946 rdylbu-11-div-5
chr - aly6 aly6 0 25113588 rdylbu-11-div-6
chr - aly7 aly7 0 24649197 rdylbu-11-div-7
chr - aly8 aly8 0 22951293 rdylbu-11-div-8
|
karyotype.tair10.txt
1
2
3
4
5
| chr - ath1 ath1 0 30427671 brbg-10-div-1
chr - ath2 ath2 0 19698289 brbg-10-div-3
chr - ath3 ath3 0 23459830 brbg-10-div-5
chr - ath4 ath4 0 18585056 brbg-10-div-7
chr - ath5 ath5 0 26975502 brbg-10-div-9
|
因为ENSMEBLE上Athalina和Alyrata的染色体命名都是1,2,3…,就会导致CIRCOS无法正确的区分来源,因此在原本的命名前加上了物种名缩写做为标签。
同时。我们要修改之前的bed文件
1
2
| sed -e 's/^/ath/' ath.uniq.bed > ath.bed
sed -e 's/^/aly/' aly.uniq.bed > aly.bed
|
links
为了构建links文件,需要利用JCVI进行共线性分析.
确保有4个文件
1
2
| $ ls ???.???
aly.bed aly.cds ath.bed ath.cds
|
用jcvi进行分析
1
2
| python -m jcvi.compara.catalog ortholog --no_strip_names ath aly
python -m jcvi.compara.synteny screen --minspan=30 --simple ath.aly.anchors ath.aly.anchors.new
|
其中ath.aly.anchors.simple是我们后续要用到的文件。
1
2
| $ head -n 1 ath.aly.anchors.simple
AT1G24260.1 AT1G27280.1 fgenesh1_pm.C_scaffold_1002045 fgenesh2_kg.1__2877__AT1G24260.1 225 -
|
我们需要将ath.aly.anchors.simple里的基因名替换成实际的位置信息,将其变成符合Circos的输入信息。
我写了一个simple2links.py脚本,代码在我的GitHub上,https://github.com/xuzhougeng/myscripts。
1
| python ~/myscripts/simple2links.py ath.aly.anchors.simple
|
最终会输出ath.aly.anchors.simple_link.txt
配置circos
接下来做如下配置。 新建一个etc文件夹,在里面建立一个links.conf用来配置links, 建立一个ticks.conf配置ticks
1
2
3
4
5
6
7
8
9
10
11
12
13
14
15
16
17
18
19
20
21
22
23
24
25
26
27
28
29
30
31
32
33
34
35
36
37
38
39
40
41
42
| mkdir etc
<links>
<link>
file = ath.aly.anchors.simple_link.txt
radius = 0.61r
color = blue_a4
ribbon = yes
</link>
</links>
show_ticks = yes
show_tick_labels = yes
<ticks>
radius = 1r
color = black
thickness = 2p
multiplier = 1e-6
format = %d
<tick>
spacing = 1u
size = 5p
</tick>
<tick>
thickness = 4p
spacing = 5u
size = 10p
show_label = yes
label_size = 10p
label_offset = 10p
format = %d
</tick>
</ticks>
|
编辑circos.conf
1
2
3
4
5
6
7
8
9
10
11
12
13
14
15
16
17
18
19
20
21
22
23
24
25
26
27
28
29
30
31
32
33
34
35
36
37
| karyotype = karyotype.tair10.txt,karyotype.aly.txt
chromosomes_color = chr1=rdylbu-11-div-1,chr2=rdylbu-11-div-3,chr3=rdylbu-11-div-5,chr4=rdylbu-11-div-7,chr5=rdylbu-11-div-9
chromosomes_units = 1000000
<<include ./etc/ticks.conf>>
<ideogram>
<spacing>
default = 0.005r
</spacing>
radius = 0.90r
thickness = 20p
fill = yes
stroke_color = dgrey
stroke_thickness = 2p
show_label = yes #展示label
label_font = default # 字体
label_radius = dims(ideogram,radius) + 0.08r #位置
label_size = 16 # 字体大小
label_parallel = yes # 是否平行
label_format = eval(sprintf("%s",var(chr))) # 格式
</ideogram>
<<include ./etc/links.conf>>
<image>
dir* = .
radius* = 500p
svg* = no
<<include etc/image.conf>>
</image>
<<include etc/colors_fonts_patterns.conf>>
<<include etc/housekeeping.conf>>
|
运行circos -conf circos.conf的效果如下
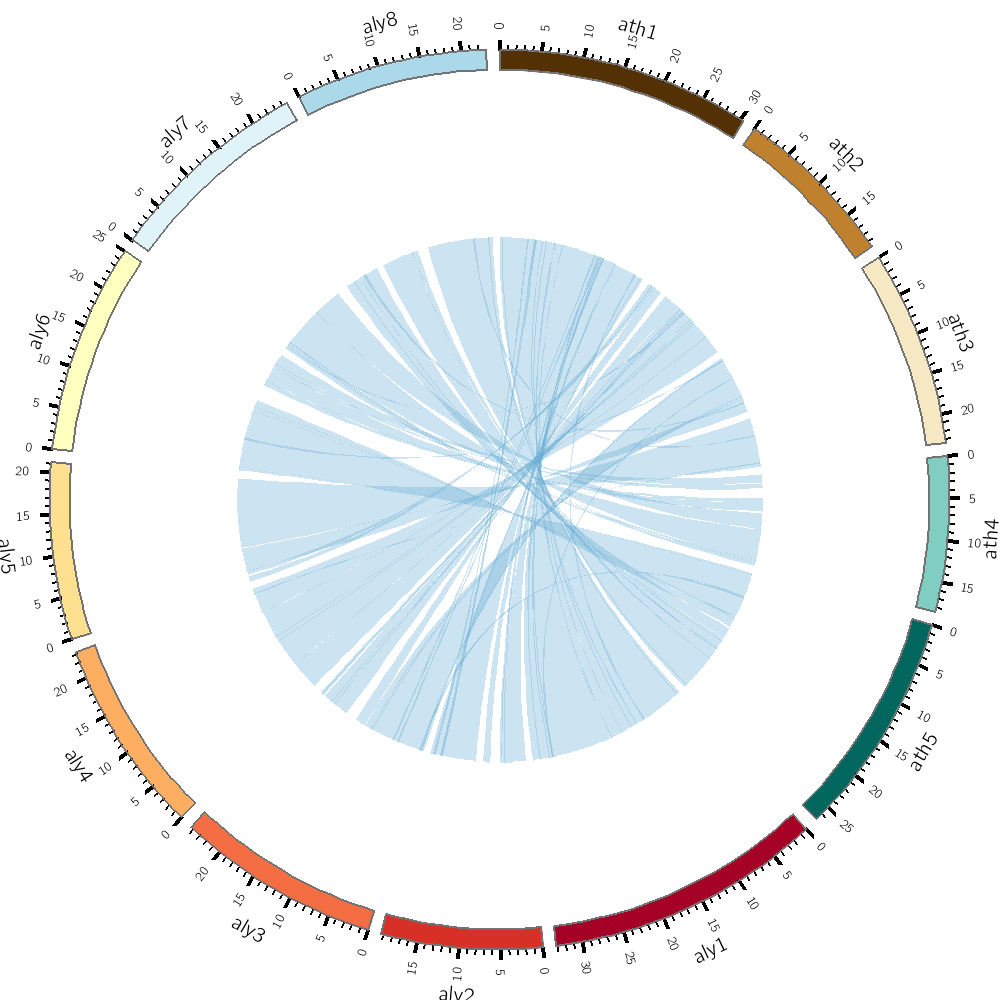
不难发现一个问题,里面线的颜色一模一样,不容易进行区分。虽然可以在输入ath.aly.anchors.simple_link.txt里增加颜色,但是circos提供了一个动态规则,可以更加方便的直接在配置文件里修改。
建立规则(rules)
circos的配置格式为
1
2
3
4
5
6
7
8
9
10
11
12
| <rules>
<rule>
...
</rule>
<rule>
...
</rule>
...
</rules>
|
circos的规则可以很复杂,但是最简单的情况就是下面这种
1
2
3
4
| <rule>
condition = var(chr1) eq "ath1"
color=rdylgn-5-div-1
</rule>
|
condition = var(chr1) eq "ath1"表示,判断link文件中左侧染色体的名字(var(chr1))是不是(eq)”ath1”,如果是的话,那么颜色就是rdylgn-5-div-1
我们可以在etc/links.conf中增加五个条件,修改后的links.conf如下
1
2
3
4
5
6
7
8
9
10
11
12
13
14
15
16
17
18
19
20
21
22
23
24
25
26
27
28
29
30
31
| <link>
file = ath.aly.anchors.simple_link.txt
radius = 0.61r
color = blue_a4
ribbon = yes
<rules>
<rule>
condition = var(chr1) eq "ath1"
color=rdylgn-5-div-1
</rule>
<rule>
condition = var(chr1) eq "ath2"
color=rdylgn-5-div-2
</rule>
<rule>
condition = var(chr1) eq "ath3"
color=rdylgn-5-div-3
</rule>
<rule>
condition = var(chr1) eq "ath4"
color=rdylgn-5-div-4
</rule>
<rule>
condition = var(chr1) eq "ath5"
color=rdylgn-5-div-5
</rule>
</rules>
</link>
</links>
|
运行circos -conf circos.conf的效果如下
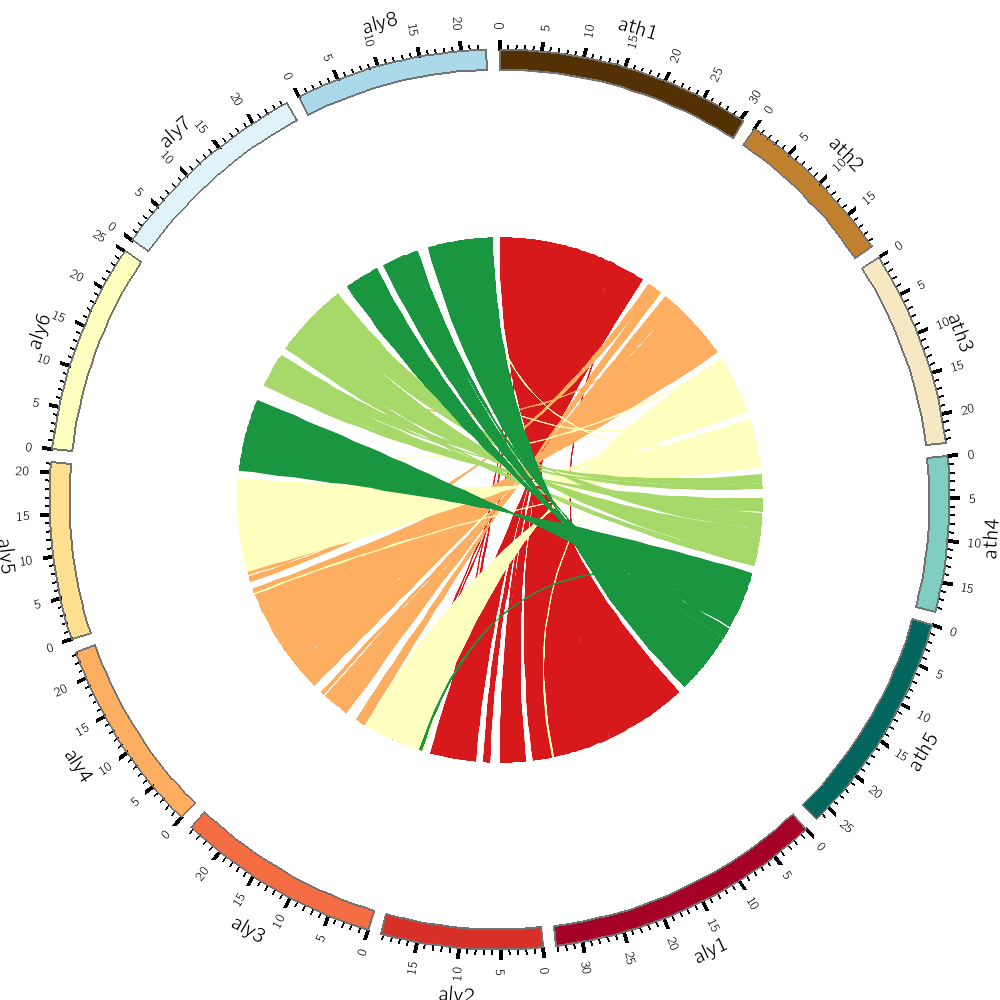
这张图还有一个问题是,通常别人的Circos染色体都是对称排列,右边第一个是ath1,那么左边第一个也最好是aly1,那么应该如何配置呢?以及两套基因组会分别占据两侧,中间有一个明显的空隙,如何做到的呢?